How to capture the Northern Lights
This article was cowritten with Ryan Yaskiw. Master Angler Ryan Yaskiw is a guide at Gangler’s Sub-Arctic, where he runs the photography workshop for the lodge’s spectacular Northern Lights Safaris.
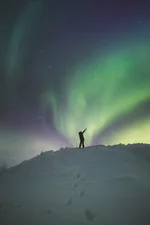
For many, seeing an aurora show is a once in a lifetime experience. Those memories will certainly remain ingrained, but knowing how to take pictures of the Northern Lights will enhance your overall trip and offers a chance to share the experience with others.
A Northern Lights tour in Canada provides the ultimate opportunity to capture stunning images of this natural phenomenon. The travel experts at Northern Lights Canada can help you plan your trip to see this natural wonder. We take care of all the details, from hotels and transfers, to booking special aurora tours.
In this guide, we will share how to take pictures of aurora borealis, including information on the best camera settings for Northern Lights, shutter speed for Northern Lights, and how to photograph the Northern Lights with an iPhone.
Popular Northern Lights tours in Canada
Manitoba Northern Lights Safari at Ganglers Lodge
This bucket-list trip takes you to Northern Manitoba for a once-in-a-lifetime aurora-viewing experience. A private charter takes you 965 kilometres (600 miles) north of Winnipeg for prime Northern Lights viewing — and photography! During the day, you’ll enjoy various eco-tours, including exploring the tundra in a float plane. Be immersed in this unique subarctic landscape in daylight and be amazed by the Northern Lights at night.
Trip length (number of nights): 6
Nights at Gangler’s: 4
Aurora-viewing evenings: 4
Photography Tour: Northern Lights of Churchill
On this photo specialist trip, travel to Churchill, Manitoba — one of the best places in the world for seeing the Northern Lights. With a dedicated photographer guide, enjoy four aurora-viewing evenings, a short photography workshop, and a variety of exciting daytime tours. Other highlights include crossing the frozen Churchill River in a tundra buggy and visiting Dan’s Diner, a remote dining experience in the subarctic wilderness.
Trip length (number of nights): 7
Nights in Churchill: 4
Aurora-viewing evenings: 4

Keep reading or chat with one of our local travel experts. We’re passionate about Canada and can help you at any stage of your vacation planning.
Why photograph the Northern Lights?
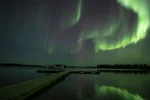
The unique beauty and breathtaking experience of witnessing the aurora borealis is something you’ll want to photograph, whether it’s just to show to friends and family or share on social media. These photos never fail to impress.
What some people don’t realize is that your phone or camera lens is also better at seeing the different colours in the night sky that the human eye. A camera at night can absorb much more light. (There’s also the science of human sight, with different cells in the eye responsible for day and night vision.) For this reason, your camera will pick up more and brighter colours than you will see with the naked eye.
Location
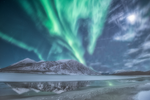
The opportunity to capture stunning images of this natural phenomenon are greater in certain destinations. Canada is hands down the ultimate spot to snap some jaw-dropping Northern Lights photos. Its vast, untouched landscapes and large areas with minimal light interference are key to making it an ideal destination for capturing the aurora borealis. Its northern regions are also located under the auroral oval, a geographic region near the Earth's polar areas where the Northern Lights are most commonly observed. This oval is essentially a "hotspot" for auroral activity due to the interaction between charged particles from the sun and the Earth's magnetic field.
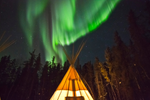
Where to Go for the Best Northern Lights Photos in Canada

Many popular northern Canadian destinations are under the oval, offering perfect front-row seats for this dazzling light show. Whether you're staying in luxury in the wilds of Manitoba, exploring the Yukon's subarctic terrain or off to the hidden corners of the Northwest Territories, you're in for a treat. It's like nature's own neon party — and Canada's the VIP section for epic photos.
Some of the top locations for the best Northern Lights photos include:
- Gangler’s Subarctic on the North Seal River in Northern Manitoba
- Dan’s Diner on the Churchill River near Churchill, Manitoba
- Churchill, Manitoba
- Yellowknife, Northwest Territories
- Whitehorse, Yukon
Weather Forecast
When photographing the Northern Lights in Canada, your success hinges on one crucial factor: the weather. Whether you're a seasoned aurora chaser or a first-timer, keeping a keen eye on the weather forecast is key.
Clear skies offer unobstructed views of the auroras, allowing you to capture their breathtaking beauty with precision. Imagine setting up your camera, eagerly anticipating the dance of vibrant colors across the night sky, only to be thwarted by a blanket of clouds. That's why staying informed about the weather forecast is vital.
An additional tool is the aurora forecast, which predicts the intensity and visibility of auroras based on solar wind data and geomagnetic activity. Monitoring the aurora forecast helps photographers plan optimal viewing times.
By combining both weather and aurora forecasts, you significantly enhance your chances of witnessing—and photographing—nature's dazzling light show.
Recommended Websites and Apps
Wondering how to track the aurora forecast? To stay ahead of the game, here are some recommended websites and apps for checking both the weather and aurora forecast:
- Space Weather Prediction Center: Offers real-time data on solar activity, crucial for predicting auroral displays.
- Aurora Forecast: Provides forecasts based on solar wind data and geomagnetic activity, helping you pinpoint optimal viewing times.
- The Weather Network: A reliable source for up-to-date weather forecasts, including cloud cover predictions.
- Clear Outside: Offers detailed astronomy forecasts, including cloud cover, transparency, and darkness.
Safety and preparation
Wondering if there are there any safety precautions to be aware of when photographing the aurora in cold and remote locations? This is one key advantage to a Northern-Lights tour. Local guides possess invaluable insights into local weather patterns and can provide real-time updates on current conditions. Their guidance can be the difference between a successful shoot and a missed opportunity.
Other safety precautions include:
- Dress Appropriately: Wear multiple layers of warm, insulating clothing to protect against cold temperatures. Ensure your outer layer is windproof and waterproof to shield against harsh weather conditions.
- Pack Essentials: Carry emergency supplies such as a first aid kit, high-energy snacks, water, a flashlight, hand warmers, and a fully charged mobile phone with emergency contacts programmed.
- Inform Someone: If you’re not part of a guided tour, be sure to inform someone of your plans, including your intended location and expected return time. If possible, travel with a companion or in a group for added safety.
- Stay Hydrated and Nourished: Cold temperatures can lead to dehydration and increased energy expenditure. Drink plenty of water and consume nutritious snacks to maintain energy levels.
- Watch for Signs of Hypothermia: Be vigilant for symptoms of hypothermia, including shivering, confusion, slurred speech, and loss of coordination. Seek shelter and warmth immediately if you or anyone in your group displays these symptoms.
- Be Mindful of Wildlife: Research the local wildlife in the area you'll be photographing and take appropriate precautions to avoid encounters. Carry bear spray or other deterrents if necessary, and know how to respond in case of an encounter.
- Monitor Weather Conditions: Stay informed about weather forecasts and be prepared to adjust your plans accordingly. Avoid venturing out during severe weather conditions or if there's a risk of avalanches or other hazards.
- Watch Your Step: Be cautious when navigating icy or snowy terrain to prevent slips, trips, and falls. Use trekking poles or traction devices if necessary, and always watch your footing.
- Respect the Environment: Leave no trace by minimizing your impact on the environment. Dispose of waste properly and respect wildlife and natural habitats.
Gear Preparation
Getting an amazing Northern Lights photo requires more than being in the right place at the right time —it also requires the right gear. From tripods with sturdy legs to wide-angle lenses and camera settings tailored for low-light conditions, having the appropriate equipment is crucial for translating the awe-inspiring spectacle into stunning photographs.
Tripod
An expert tip from Ryan: “Camera stabilization is key due to the long exposure times necessary for capturing the Northern Lights. So, a tripod is a must for stability— whether you’re using a DSLR or your smartphone. It doesn’t need to be fancy or high end, just functional.”
Qualities to look for in a tripod:
- sturdy legs
- an adjustable ball head
- made of carbon fiber material for vibration reduction
Camera and Lens Selection
Choosing the right camera and lens is pivotal for taking the best photos of the Northern Lights. Opt for a camera with excellent low-light performance and manual controls. You want to be able to adjust settings like ISO, aperture, and shutter speed.
Ryan says: “Now a days there’s so many more choices when it comes to camera and lens selection. The big dog in this show will always be a DSLR — be it a basic entry-level body all the way up to a high-end mirror-less one. (A Digital Single Lens Reflex camera is a type of digital camera that uses a mirror mechanism to reflect light from the lens to an optical viewfinder.) They all take great photographs when paired with a high-quality lens.
“For lens selection, one can’t go wrong with a wide-angle fixed focal length that has a large aperture (2.8 or wider) or even a large aperture zoom lens that has wide angle at the start of its range.”
Remote shutter release
Ryan advises that, “a remote shutter release is also a great piece for your kit for those shooting with a DSLR. It will allow you to activate the shutter without touching the camera, reducing the chances of excessive vibration ruining the image. It also takes the delay out of the shot for those who choose to shoot images using a delayed shutter button on the camera.”
Spare batteries
One of Ryan’s top pieces of advise is around batteries. “Batteries are the lifeblood of any camera, and a dead one at the wrong time will be devastating,” he says. “Picking up an extra battery is a great insurance policy, and ensuring all batteries are fully charged each day will save a person from a potential heartbreak.
When shooting in cold climates it’s a great idea to keep that extra battery in a ziplock bag in a pocket up against your body. That way it’s ready if the battery in the camera should get to cold to function.”
Bringing an extra battery offers peace of mind, guaranteeing uninterrupted shooting even if one battery unexpectedly drains faster than anticipated. With spare batteries snugly tucked away and ready to go, you can focus on capturing the Northern Lights in all their splendor without the worry of power depletion dampening your experience.
Camera settings for Northern Lights: Aperture, ISO, shutter speed, and white balance
As someone who works with beginners shooting the lights for the first time, Ryan knows that using the manual-mode feature on a DSLR can be daunting, but says it is essential in aurora photography. “Being able to manipulate ISO, shutter speed and aperture are key in capturing quality images. The exposure triangle graphic points out how these three settings work together, and the only way a person can manipulate all three is to shoot in manual.”
Mastering manual mode is key to unlocking the full potential of your camera when photographing the Northern Lights. In low-light conditions, such as those encountered during aurora-viewing tours, relying on manual settings grants you precise control over exposure, aperture, and shutter speed.
Ryan’s crash course in what the manual-mode settings mean:
F-stop is how open the aperture is in the lens. The smaller the number the more open it is. You want to keep the aperture as open as possible for aurora photography.
ISO is the speed in which the image sensor picks up available light. The bigger the number the quicker it is. But, quick ISO comes with a trade off of degraded image quality. So there’s a balance to find.
Shutter speed is how long the image sensor is exposed to light. The shutter speed for Northern Lights is generally measured in seconds.
Ryan advises these steps for DSLR settings for Northern Lights:
The first step is to manually set the camera focus to infinity. This will have the lens focused on subjects far away.
For white balance for Northern Lights, I set the camera’s white balance to 3500k. This ensures the colour in the images will be close to how our eyes see it.
I always set my lens/camera up at f2:8, 1600 ISO and shutter speed at 5 seconds. Keeping shutter speed as quick as possible is paramount in capturing crisp images.
If the first image is underexposed I then adjust the ISO higher to 2500. If the image is still underexposed I then start to lengthen exposure time. Eventually the perfect balance is found.
The opposite is true if the initial settings produce images that are overexposed. I then slow down the ISO to 800, and if needed quicken the shutter speed to 3 seconds.
His advice: “Every camera model is different, and the setting is suggested are a starting point. It may take some playing to find the sweet zone for aurora photography in your camera’s settings.”
How to photograph Northern Lights with iPhone
People who don’t own a DSLR are still in luck. Many of the guests that Ryan works with only have their phones.
“Camera phones have come a long way in recent years, and the photographs they can now take of the aurora will give a DSLR a run,” he says. “Rule of thumb with smart phones is the newer is better. iPhone 12 and up will take great nighttime shots, and Samsung s21 and up do just as good of a job. If you’re unsure if your phone’s camera is capable it’s important to reach out to someone knowledgeable.”
Most tours will have a guide who has some tips and tricks to share with regards to shooting the lights with your phone.
Frequently Asked Questions
Ryan Yaskiw runs the photography workshop at Gangler’s Sub-Arctic during its Northern Lights Safaris. He answers these common questions about the best way to photograph the Northern Lights.
Are there specific mobile apps that can enhance the capture of the Northern Lights?
The built-in camera apps are fairly intuitive, and some simple change in settings make using a night-mode easy (which I highly recommend using). But there are some apps that are aurora/night photography specific. I have seen previous guests use Norther Lights Photo Taker App (Apple iOS), Cortex Camera (Apple iOS/Android) and NightCap Pro (Apple iOS). They seem simple to use, offer a manual setting feature and do a great job of capturing the aurora.
Are there any filters that can enhance the capture of the Northern Lights?
General rule of thumb is to avoid using filters on a DSLR for any night photography. It may reduce the amount of light reaching the image sensor, thus unnecessarily requiring adjusting the camera’s settings and potentially lowering the image quality.
Are there any common mistakes to avoid when photographing the Northern Lights?
The biggest mistake I see is guests showing up with equipment that isn’t capable to capture the aurora. Be it an older phone, or a camera that lacks a manual setting. To me it seems like a shame to travel all that way just to have equipment come up short. This is where asking an expert is paramount. It might mean an investment in new gear in the end, but a few hundred dollars spent is nothing when combined with the overall cost of a trip to see the aurora.
Why book your trip with Fresh Tracks Canada?

Unforgettable Canadian vacations made just for you
Enjoy local expertise and guidance with a fully planned itinerary. Personalize your trip by adding extra time in Canada at the start or end of your Northern Lights tour.
We take care of all the details
Relax and focus on making memories. Let us make all of the bookings for you, including your guided Northern Lights tour, hotels, excursions and activities, and transfers.
Support when you need it
We’re here to make sure you get the inside scoop before you even leave home. And you can relax on your vacation because you know that we’re a phone call away if you have any questions while you’re in Canada.
Explore Northern Lights by region

Discuss your Northern Lights tour with a Canadian travel expert

Sign up for travel inspiration
Our newsletter is full of travel tips and local insights for your Northern Lights tour in Canada.